I built a retro RPG game shop extension for my Magento 2 store
Creating a custom Magento 2 marketplace with Vue, Tailwind, and a dash of RPG flair
Written in February 2, 2025 - 🕒 10 min. readMy brand-new project (or side-gig?), Zenkai Zone, had grown into a solid e-commerce site, but let’s face it - just using the plain Magento 2 template is a bit meh, I mean, come on, I’m the guy who created a whole game for this blog, I should be able to come up with fun for my e-commerce. Right?
Ideation Phase
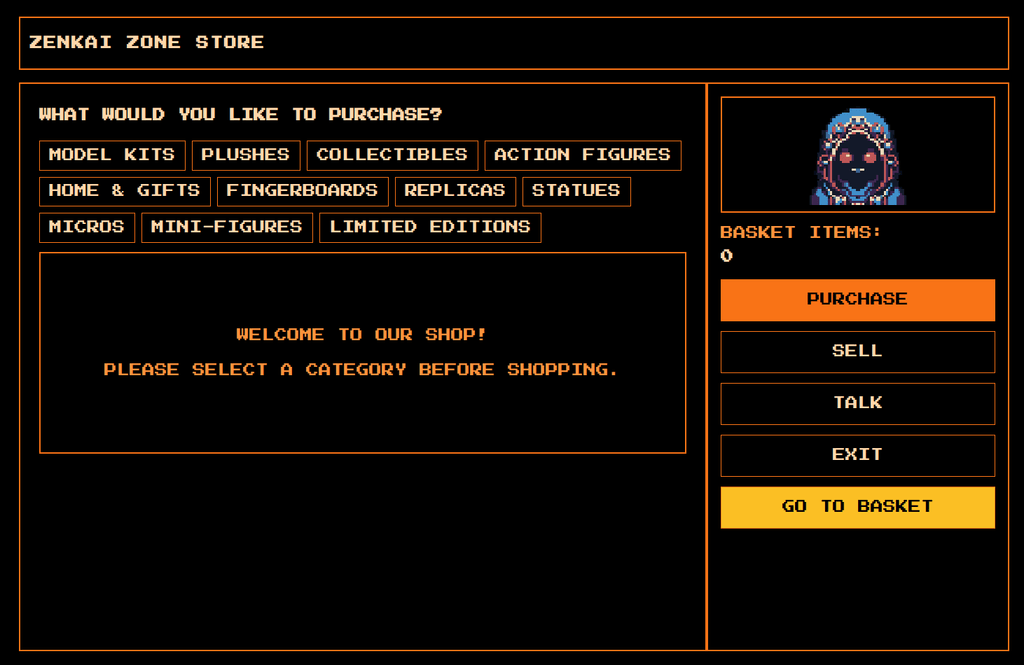
I wanted to spice things up, inject a little personality, and make the shopping experience more engaging. So, I decided to build GameShop - a Magento 2 extension designed specifically for Zenkai Zone that transforms the storefront into something reminiscent of an old-school RPG shop. With a dedicated page complete with a shopkeeper avatar, custom API endpoints, and a touch of SEO magic for social sharing, the idea was to make my site less boring and more fun.

In this guide, I’ll walk you through how I combined Vue.js, TailwindCSS, custom Magento APIs, and well-placed SEO enhancements to bring that extra zing to Zenkai Zone. Along the way, you’ll see code snippets and my commentary on what’s happening under the hood. Let’s dive in.
Project Overview: What We’re Building
- A fresh, Vue + Tailwind-powered storefront page at
/game-shoptailored for Zenkai Zone. - API endpoints to handle cart, categories, and products in ways Magento’s core might not be flexible enough for.
- SEO-friendly metadata and Open Graph tags for a killer social-media share preview.
- A brand-new admin panel setting to toggle the entire extension on or off without touching the code.
Magento 2 Module Structure
Here’s the tidy file structure for the GameShop module. Keeping it organized means I can always find what I need - even if I’m in the middle of another project idea for Zenkai Zone:
app/code/Werules/GameShop/
├── Api/
│   ├── CartManagementInterface.php
│   ├── CategoryManagementInterface.php
│   ├── ProductManagementInterface.php
├── Controller/
│   ├── Index/
│   │   ├── Index.php
├── etc/
│   ├── adminhtml/
│   │   ├── system.xml
│   ├── frontend/
│   │   ├── di.xml
│   │   ├── module.xml
│   │   ├── routes.xml
│   ├── webapi.xml
├── Model/
│   ├── CartManagement.php
│   ├── CategoryManagement.php
│   ├── ProductManagement.php
├── view/
│   ├── frontend/
│   │   ├── layout/
│   │   │   ├── werules_gameshop_index_index.xml
│   │   ├── templates/
│   │   │   ├── index.phtml
│   │   ├── web/
│   │   │   ├── css/
│   │   │   │   ├── gameshop.css
│   │   │   ├── js/
│   │   │   │   ├── vue.global.js
│   │   │   │   ├── tailwind.min.js
│   │   │   ├── images/
│   │   │   │   ├── shopkeeper.png
├── registration.php
Step 1: Crafting the Custom Frontend Page
Defining the Route
The first step was to set up the route. In routes.xml, I mapped /game-shop to the custom module route, ensuring that all traffic for this extension is neatly directed.
<?xml version="1.0"?>
<config xmlns:xsi="http://www.w3.org/2001/XMLSchema-instance"
        xsi:noNamespaceSchemaLocation="urn:magento:framework:App/etc/routes.xsd">
    <router id="standard">
        <route id="werules_gameshop" frontName="game-shop">
            <module name="Werules_GameShop"/>
        </route>
    </router>
</config>
Create the Controller
Next up was the Index.php controller. This file decides whether to display the new GameShop page or, if the extension is disabled, show Magento’s standard no-route page.
<?php
namespace Werules\GameShop\Controller\Index;

use Magento\Framework\App\Action\Action;
use Magento\Framework\App\Action\Context;
use Magento\Framework\Controller\ResultFactory;
use Magento\Framework\App\Config\ScopeConfigInterface;

class Index extends Action
{
    protected $scopeConfig;

    public function __construct(
        Context $context,
        ScopeConfigInterface $scopeConfig
    ) {
        parent::__construct($context);
        $this->scopeConfig = $scopeConfig;
    }

    public function execute()
    {
        // Check if the extension is activated for [Zenkai Zone](https://zenkaizone.com)
        $isEnabled = $this->scopeConfig->isSetFlag('werules/gameshop/enabled', \Magento\Store\Model\ScopeInterface::SCOPE_STORE);
        if (!$isEnabled) {
            // If not, redirect to Magento's default no-route page
            return $this->resultFactory->create(ResultFactory::TYPE_FORWARD)->forward('noroute');
        }

        // Otherwise, load our new, fun page
        $resultPage = $this->resultFactory->create(ResultFactory::TYPE_PAGE);
        $resultPage->getConfig()->getTitle()->set(__('Game Shop'));
        return $resultPage;
    }
}
Step 2: Enhancing Our Magento APIs
Magento 2’s API system is robust, but I wanted more control for Zenkai Zone. By introducing custom interfaces and implementations, I could tailor the behavior exactly as needed.
Cart Management API (CartManagement.php)
If the extension is disabled, the API politely returns zero; otherwise, it behaves like your standard cart functions - just with a bit more personality.
public function getCartItemCount()
{
    if (!$this->isModuleEnabled()) {
        return 0;
    }

    $quote = $this->cart->getQuote();
    return (int)$quote->getItemsQty();
}

public function addItemToCart($productId, $qty = 1)
{
    if (!$this->isModuleEnabled()) {
        return ['success' => false, 'message' => 'GameShop is disabled.', 'cart_count' => 0];
    }

    // Normal add-to-cart logic here
}
Product Management API (ProductManagement.php)
Similarly, this API provides product listings from any category, but only if the extension is active.
public function getProductsByCategoryId($categoryId)
{
    if (!$this->isModuleEnabled()) {
        return [];
    }

    // Standard product retrieval logic
}
Designing a Retro-Inspired GameShop UI
I wanted to give Zenkai Zone an extra dose of personality. By injecting a “classic RPG shop” vibe using Vue.js for reactivity and TailwindCSS for styling, the storefront transforms into something fun and memorable - much more engaging than a typical e-commerce page.
Here’s the layout:
- Persistent header showing the store name.
- Shopkeeper sidebar with an avatar, live cart count, and menu options (Buy, Sell, Talk, Exit).
- Main content panel displaying dynamic category and product listings, along with a detailed product view.

Putting the Layout Together
Inside index.phtml, I set up the container for my Vue app:
Our Vue.js App Container
<div id="app" class="min-h-screen bg-black text-orange-200 font-mono p-6 flex flex-col space-y-4 text-lg">- Vue mounts onto
#app. - The black background + orange text evoke that nostalgic console-based look.
A Sticky Header for Store Name
<div class="border-2 border-orange-500 p-3 sticky top-0 bg-black z-50">
    <h1 class="text-3xl md:text-4xl font-bold tracking-widest uppercase">
        <?php echo $currentStoreName; ?>
    </h1>
</div>- The sticky header keeps the store name visible, so shoppers always know they’re in Zenkai Zone.
Sidebar Navigation: Shopkeeper Avatar & Menu
This section is all about personality. The shopkeeper avatar welcomes visitors, while the cart count and menu buttons (Buy, Sell, Talk, Exit) add an interactive touch.
<!-- Shopkeeper Avatar -->
<div class="border-2 border-orange-500 p-2 flex justify-center items-center bg-black">
    <img src="<?= $block->getViewFileUrl('Werules_GameShop::images/shopkeeper.png'); ?>"
         alt="<?= __('Shopkeeper Avatar'); ?>"
         class="w-32 h-32 object-cover border border-orange-500 bg-black avatar">
</div>

<!-- Cart Count -->
<div class="mb-4">
    <div class="text-lg text-orange-400"><?= __('Cart items:'); ?></div>
    <div class="text-2xl font-bold">{{ cartCount }}</div>
</div>
Real-time updates via Vue keep the interface lively and responsive.
Adding Menu Buttons
<button class="block w-full py-3 border border-orange-500 hover:bg-orange-900 text-center px-4 text-lg"
        :class="{'bg-orange-500 text-black': menuSelection === 'Buy'}"
        @click="onMenuItemClick('Buy')">
    <?= __('Buy'); ?>
</button>

<button class="block w-full py-3 border border-orange-500 hover:bg-orange-900 text-center px-4 text-lg"
        :class="{'bg-orange-500 text-black': menuSelection === 'Sell'}"
        @click="onMenuItemClick('Sell')">
    <?= __('Sell'); ?>
</button>

<button class="block w-full py-3 border border-orange-500 hover:bg-orange-900 text-center px-4 text-lg"
        @click="onMenuItemClick('Exit')">
    <?= __('Exit'); ?>
</button>- Conditional styling highlights the current selection.
- The Exit button can redirect shoppers back to the main Zenkai Zone site if needed.
The Main Content Area: Categories & Product Listings
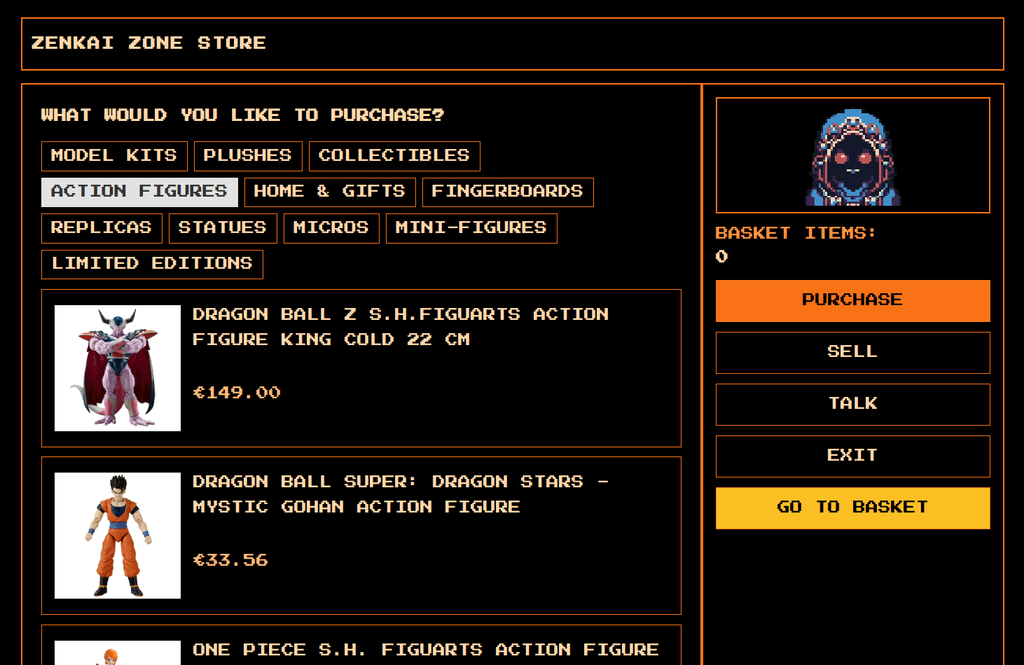
When users select “Buy,” they see categories along the top. Selecting a category displays a grid of products - dynamic content powered by our custom APIs.
Category Tabs
<!-- Category Tabs -->
<div v-if="activeView === 'list'" class="flex flex-wrap gap-2 mb-3">
    <button v-for="cat in categories" :key="cat.id"
            class="px-3 py-1 border border-orange-500 hover:bg-orange-500 hover:text-black transition"
            :class="{'bg-orange-500 text-black': currentCategoryId === cat.id}"
            @click="loadProducts(cat.id, cat.name)">
        {{ cat.name }}
    </button>
</div>- Categories are fetched from our
rest/V1/gameshop/categoriesendpoint. - A Vue
v-forloop ensures each category is automatically rendered.
Product List Grid
<div v-if="activeView === 'list'">
    <div v-if="products.length === 0" class="text-center text-orange-400 text-lg mt-6">
        <?= __('No products found in this category.'); ?>
    </div>

    <div class="space-y-3">
        <div v-for="product in products" :key="product.id"
             class="border border-orange-500 p-4 flex flex-col md:flex-row items-center cursor-pointer hover:bg-orange-900 transition"
             @click="showDetails(product)">
            <img :src="product.image_url"
                 class="w-32 h-32 object-cover border border-orange-500 bg-black">
            <div class="flex-1 text-center md:text-left">
                <span class="block text-lg">{{ product.name }}</span>
                <span class="block text-xl text-orange-300 mt-2">{{ formatPrice(product.price) }}</span>
            </div>
        </div>
    </div>
</div>- Clicking a product brings up the detail view.
- The design ensures that every product stands out, adding flair to the shopping experience.

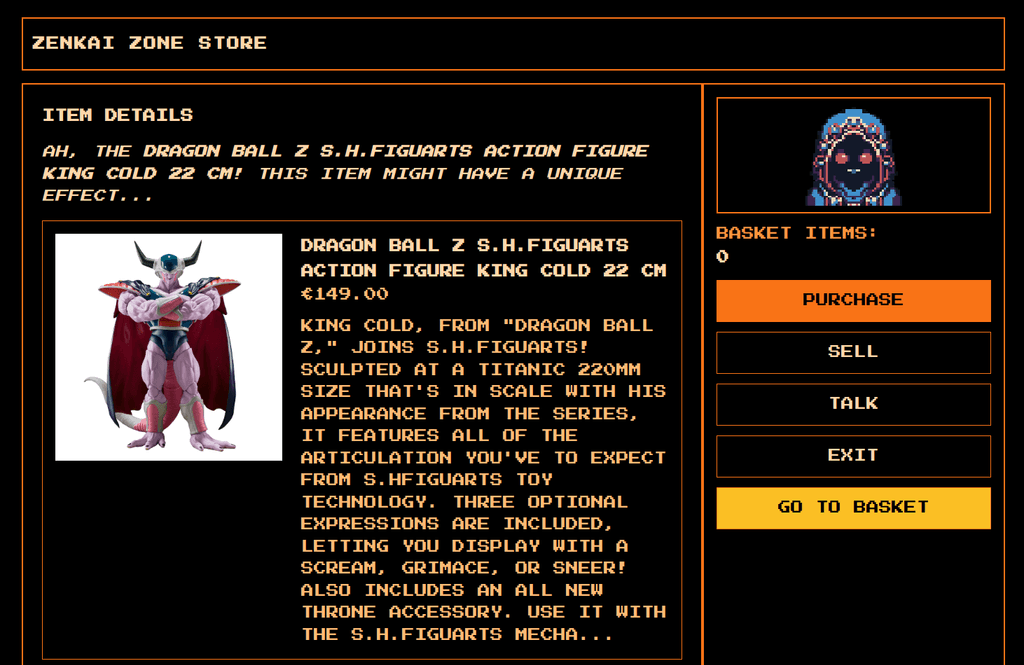
Detailed Product View
Once a product is selected, a detailed view shows its name, price, description, and an Add to Cart button.
<div v-if="activeView === 'detail' && currentProduct" class="space-y-4">
    <p class="italic text-lg mb-2">
        <?= sprintf(__('Ah, the %s! This item might do something special...'), '<strong>{{ currentProduct.name }}</strong>'); ?>
    </p>

    <div class="flex flex-col md:flex-row space-y-4 items-start border border-orange-500 p-4">
        <img :src="currentProduct.image_url"
             class="w-72 h-72 object-cover border border-orange-500 bg-black">
        <div class="flex-1">
            <h3 class="text-2xl font-bold">{{ currentProduct.name }}</h3>
            <p class="text-orange-300 text-xl mb-3">{{ formatPrice(product.price) }}</p>
            <p class="text-lg text-orange-300">
                {{ currentProduct.description }}
            </p>
        </div>
    </div>

    <div class="flex flex-col sm:flex-row space-y-4 sm:space-y-0 sm:space-x-6">
        <button @click="addToCart(currentProduct.id)"
                class="px-5 py-3 bg-orange-500 text-black border border-orange-500 hover:bg-orange-600 transition text-xl">
            <?= __('Add to Cart'); ?>
        </button>
        <button @click="goBackToList()"
                class="px-5 py-3 border border-orange-500 hover:bg-orange-900 text-orange-200 transition text-xl">
            <?= __('Back'); ?>
        </button>
    </div>
</div>
The simple toggle between “list” and “detail” views - powered by Vue - keeps the user experience smooth and uninterrupted.

Shopkeeper Banter: The “Talk” Menu
For a touch of personality, the “Talk” menu lets the shopkeeper share random one-liners. It’s an optional feature that adds some extra character to the shopping experience.
<div v-else-if="menuSelection === 'Talk'" class="flex items-center justify-center h-64 border-2 border-orange-500 p-6">
    <p class="text-3xl text-orange-400 text-center">
        {{ currentTalkLine }}
    </p>
</div>methods: {
onMenuItemClick(selection) {
if (selection === 'Talk') {
const randomIndex = Math.floor(Math.random() * this.talkLines.length);
this.currentTalkLine = this.talkLines[randomIndex];
}
}
}This little feature can even be extended to offer surprise discounts or product recommendations.
Step 3: SEO Enhancements
To boost Zenkai Zone’s social sharing, I added meta tags and JSON-LD data into the <head>. This ensures that platforms like Facebook and Twitter display a compelling preview featuring the shopkeeper image.
Update werules_gameshop_index_index.xml
<referenceBlock name="head.additional">
    <block class="Magento\Framework\View\Element\Template"
           name="werules.gameshop.head"
           template="Werules_GameShop::seo/head.phtml"/>
</referenceBlock>
Create head.phtml
<?php
$mediaUrl = $block->getViewFileUrl('Werules_GameShop::images/shopkeeper.png');
$baseUrl = $block->getBaseUrl();
$pageTitle = __('GameShop - Buy & Sell Games');
$pageDescription = __('Find the best gaming deals, buy and sell games easily!');
?>

<!-- Open Graph Meta Tags -->
<meta property="og:image" content="<?= $mediaUrl ?>"/>
<meta property="og:image:alt" content="GameShop Shopkeeper Avatar"/>
<meta property="og:url" content="<?= $baseUrl ?>game-shop"/>

<!-- Twitter Card -->
<meta name="twitter:image" content="<?= $mediaUrl ?>"/>

<!-- JSON-LD Structured Data -->
<script type="application/ld+json">
{
    "@context": "https://schema.org",
    "@type": "WebPage",
    "name": "<?= $pageTitle ?>",
    "description": "<?= $pageDescription ?>",
    "image": "<?= $mediaUrl ?>",
    "url": "<?= $baseUrl ?>game-shop",
    "publisher": {
        "@type": "Organization",
        "name": "GameShop",
        "logo": "<?= $mediaUrl ?>"
    }
}
</script>
With these tags in place, the extension not only looks good but also performs well in SEO and social shares.
Final Steps & Testing
Enable the Extension
bin/magento module:enable Werules_GameShop
bin/magento setup:upgrade
bin/magento cache:flush
Now your module is officially alive.
Try the Frontend
Head over to https://yourmagento.com/game-shop and if you see the black/orange interface with the shopkeeper, the job is done.
Of course, you can also check a live demo of the GameShop extension at zenkaizone.com/game-shop.
Wrapping Up & Next Ideas
That’s it! We’ve transformed Zenkai Zone’s storefront by creating a custom Magento 2 extension that not only introduces new cart & product APIs but also brings in a playful, RPG-inspired design with excellent SEO integration. Moving forward, there’s plenty of room to expand this concept:
- User authentication to let shoppers save their progress in the virtual shop.
- Checkout integration with the custom
game-shoproute for a complete alternate storefront experience. - Advanced product filtering to match game genres or even random retro references.
I had a lot of fun merging a bit of gaming nostalgia with modern e-commerce functionality using Vue.js and TailwindCSS. The final result is a quirky, engaging extension that makes Zenkai Zone far more interesting. Who knew shopping online could feel like an adventure?
Contributing to the GameShop Extension
Of course, as all of my projects, the GameShop extension is open-source and available on GitHub. Feel free to fork it, play around, and contribute to the project. I’d love to see what you come up with!
Where do we go from here? Maybe integrating ChatGPT to offer personalized product recommendations or adding a currency system so customers can trade “gold coins” for discounts. Whatever the next step, the goal is clear: keep the shopping experience fresh and fun.
Happy coding!
Tags:
Related posts
Post a comment
Comments
No comments yet.


