

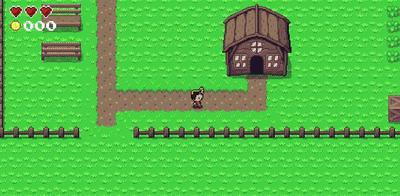
I made a top-down game version of my blog with Phaser and React
Learn how to create a top-down RPG game using Phaser and React, including integrating with Gatsby and creating the game map with Tiled
Written in October 12, 2021 - 🕒 9 min. readYes, that’s right, there is now a game version of this website. Tired of clicking around boring pages and reading stuff? What about dive into a journey of a top-down RPG-like game and find the blog posts and read them in-game?
Play it here!
You can also check the source-code for on my GitHub repository for this project.
Ok, but why?

The idea was born when I added Konami Code to my website, which makes the Matrix source-code show up in the background of the website (try it now), which although is super cool, I was thinking it would be even cooler to make the Konami Code open a game or something, and since I already have 2 years of experience in Phaser, I decided to make a silly game just as an MVP.
Around the same days, I found out about the grid-engine Phaser plugin that makes it SO much easier to create a top-down RPG-like game, that I decided to make a game with it, and also because my first “programming” experience date backs to 2002 when I was creating games exactly like this with RPG Maker.
From then on the project started to get a little more ambitious, and I thought “what if I show the blog posts in-game?”, all the blog data is available in React via GraphQL anyway, so it shouldn’t be too difficult.
Using React as UI for Phaser
Phaser works by rendering pixels inside a canvas element in the DOM, and it’s great, but one of the great features of web development is the power of the DOM and CSS to create great UI elements, and you can’t do that with Phaser alone.
The simplest way to use Phaser with React is with a functional component like the one below.
import React from 'react';
import Phaser from 'phaser';

function GameComponent() {
    const game = new Phaser.Game({
        ...configs,
        parent: 'game-content',
    });

    return <div id="game-content" />;
};

export default GameComponent;
And that works fine for most cases, but to make Phaser be able to communicate back and forth with React, like to show a menu item or a dialog box, I will dispatch JavaScript events between Phaser and React.
The best way to do it would be with some sort of state management tool like Flux, but since this is just a very small project, dispatching JavaScript events will work for now. Check the example below how to do it:
// React component
function GameComponent() {
    const [messages, setMessage] = useState('');
    const [showDialogBox, setShowDialogBox] = useState(false);

    useEffect(() => {
        const dialogBoxEventListener = ({ detail }) => {
            setMessage(detail.message);
            setShowDialogBox(true);
        };
        window.addEventListener('start-dialog', dialogBoxEventListener);

        return () => {
            window.removeEventListener('start-dialog', dialogBoxEventListener);
        };
    });

    const handleMessageIsDone = useCallback(() => {
        const customEvent = new CustomEvent('end-dialog');
        window.dispatchEvent(customEvent);

        setMessage('');
        setShowDialogBox(false);
    }, [characterName]);

    return (
        <>
            {showDialogBox && (
                <DialogBox
                    message={message}
                    onDone={handleMessageIsDone}
                />
            )}
            <div id="game-content" />
        </>
    );
};

// Phaser scene
class GameScene extends Phaser.Scene {
    constructor() {
        super('GameScene');
    }

    create() {
        const dialogBoxFinishedEventListener = () => {
            window.removeEventListener('end-dialog', dialogBoxFinishedEventListener);
            // Do whatever is needed when the dialog is over
        };
        window.addEventListener('end-dialog', dialogBoxFinishedEventListener);
    }
}
If you want more details on how to create a React dialog box for your Phaser game, check my blog post on it.
Integrating Phaser with Gatsby
Gatsby is a static site generator powered by React, but Phaser is a client only package (I mean of course, why would you need Phaser in the backend?), so whenever Gatsby was building my game page I’d get SSR errors because Phaser was trying to access client-side only APIs.
To solve this, I used the React hook useEffect to dynamically import all my Phaser-related modules, as useEffect is only executed on the client-side.
function GameComponent() {
    // to use async/await inside a useEffect we need to create an async function and call it
    useEffect(() => {
        async function initPhaser() {
            // Need to initialize Phaser here otherwise Gatsby will try to SSR it
            const Phaser = await import('phaser');
            const { default: GameScene } = await import('../game/scenes/GameScene');
            const { default: GridEngine } = await import('grid-engine');

            const game = new Phaser.Game({
                ...configs,
                parent: 'game-content',
                scene: [GameScene],
            });
        }

        initPhaser();
    }, []);

    return <div id="game-content" />;
};
Creating the map
To create the map I will again use Tiled, which is a FOSS in which you can create maps and use them in almost any game engine.
The tileset I’m using for my map is the Zelda-like tileset created by ArMM1998, which includes indoor and outdoor tilesets.
First I will create the tileset on Tiled and set a property called ge_collide to true on all tiles I want to have a collision with the hero

It’s important to create your map with multiple layers, so some parts can be below and some parts above the hero.
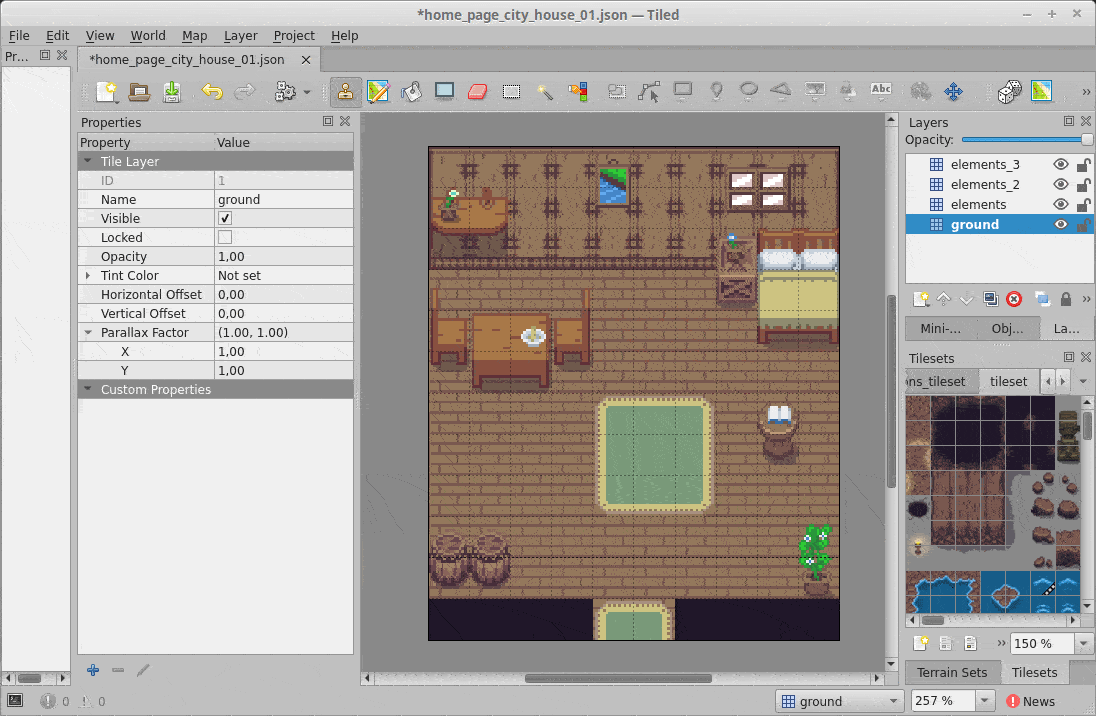
After the map is done, I will embed the tileset into the map, and then I can simply import the map and tileset file into my game and load them in Phaser.
import mainMapaJson from '../../../content/assets/game/maps/main-map.json';
import tilesetImage from '../../../content/assets/game/maps/tileset.png';

class GameScene extends Phaser.Scene {
    constructor() {
        super('GameScene');
    }

    preload() {
        this.load.tilemapTiledJSON('main-map', mainMapaJson);
        this.load.image('tileset', tilesetImage);
    }
}
Using the grid-engine Phaser plugin
As I mentioned at the beginning of the post, creating a top-down RPG Maker style game using the grid-engine plugin is easy-peasy, just configure your game to use arcade physics and add grid-engine as a plugin.
const game = new Phaser.Game({
    ...configs,
    parent: 'game-content',
    physics: {
        default: 'arcade',
    },
    plugins: {
        scene: [{
                key: 'gridEngine',
                plugin: GridEngine,
                mapping: 'gridEngine',
            }],
    },
});
Now I can access the plugin via this.gridEngine inside any Phaser game scene. The next step is to create a sprite and move it with the grid-engine plugin.
create() {
    const map = this.make.tilemap({ key: 'main-map' });
    map.addTilesetImage('tileset', 'tileset');
    map.layers.forEach((layer, index) => {
        map.createLayer(index, 'tileset', 0, 0);
    });

    const heroSprite = this.physics.add.sprite(0, 0, 'hero');

    const gridEngineConfig = {
        characters: [{
            id: 'hero',
            sprite: heroSprite,
            startPosition: { x: 1, y: 1 },
        }],
    };
    this.gridEngine.create(map, gridEngineConfig);
}

update() {
    const cursors = this.input.keyboard.createCursorKeys();

    if (cursors.left.isDown) {
        this.gridEngine.move('hero', 'left');
    } else if (cursors.right.isDown) {
        this.gridEngine.move('hero', 'right');
    } else if (cursors.up.isDown) {
        this.gridEngine.move('hero', 'up');
    } else if (cursors.down.isDown) {
        this.gridEngine.move('hero', 'down');
    }
}
This code was pretty much copied and pasted from their official documentation page.
As I mentioned before, to make collisions work automatically with a map created on Tiled, just add the property ge_collide set to true for the tiles the hero is supposed to collide with.
Notice that this will make the hero move and collide with objects, but there is no walking animation. To create new sprite animations I will use the this.anims.create() function, and then play that animation every time the grid-engine tells me that the player moved, with the movementStarted, movementStopped and directionChanged events dispatched by the grid-engine.
create() {
    const heroSprite = this.physics.add.sprite(0, 0, 'hero');
    this.createHeroWalkingAnimation('up');
    this.createHeroWalkingAnimation('right');
    this.createHeroWalkingAnimation('down');
    this.createHeroWalkingAnimation('left');

    this.gridEngine.create(map, gridEngineConfig);
    this.gridEngine.movementStarted().subscribe(({ direction }) => {
        heroSprite.anims.play(direction);
    });

    this.gridEngine.movementStopped().subscribe(({ direction }) => {
        heroSprite.anims.stop();
        heroSprite.setFrame('down_01');
    });

    this.gridEngine.directionChanged().subscribe(({ direction }) => {
        heroSprite.setFrame('down_01');
    });
}

createHeroWalkingAnimation(direction) {
    this.anims.create({
        key: direction,
        frames: [
            { key: 'hero', frame: `${direction}_01` },
            { key: 'hero', frame: `${direction}_02` },
        ],
        frameRate: 4,
        repeat: -1,
        yoyo: true,
    });
}
I go into more detail on how the game mechanics were made in this post.
Getting posts data from Gatsby
Gatsby makes all your static data available via GraphQL, on my blog I use the markdown plugin for my posts, so I access my data as follows:
import React from 'react';
import { graphql } from 'gatsby';

function GamePage({ data }) {
    const allPosts = data.allMarkdownRemark.edges;

    return (
        <div>
            {allPosts.map((post, index) => {
                return (
                    <div>
                        <h1>{post.node.frontmatter.title}</h1>
                        <section
                            key={index}
                            dangerouslySetInnerHTML={{ __html: post.node.html }}
                        />
                    </div>
                );
            })}
        </div>
    );
}

export default GamePage;

export const pageQuery = graphql`
    query GamePage() {
        allMarkdownRemark(
            sort: { fields: [frontmatter___date], order: DESC }
        ) {
            edges {
                node {
                    html
                    frontmatter {
                        date
                        title
                        category
                    }
                }
            }
        }
    }
`;
After adding the GraphQL query, all my posts data are available via the data.allMarkdownRemark.edges props.
Now in the game, I can dispatch a JavaScript event asking React to show all my blog posts in a list or something, and then when a blog post is chosen, show it in a Material UI Modal.
Adding it all together
This is what my GamePage final code looks like:
import React from 'react';
import { graphql } from 'gatsby';

function GamePage({ data }) {
    const allPosts = data.allMarkdownRemark.edges;
    const [messages, setMessage] = useState('');
    const [showDialogBox, setShowDialogBox] = useState(false);
    const [showBlogPost, setShowBlogPost] = useState(false);
    const [showBlogPostList, setShowBlogPostList] = useState(false);
    const [post, setPost] = useState({});

    useEffect(() => {
        const dialogBoxEventListener = ({ detail }) => {
            setMessage(detail.message);
            setShowDialogBox(true);
        };
        window.addEventListener('start-dialog', dialogBoxEventListener);

        const showPostListEventListener = ({ detail }) => {
            setShowBlogPostList(true);
        };
        window.addEventListener('start-dialog', showPostListEventListener);

        const showPostEventListener = ({ detail }) => {
            setPost(detail.post);
            setShowBlogPost(true);
        };
        window.addEventListener('start-dialog', showPostEventListener);

        return () => {
            window.removeEventListener('start-dialog', dialogBoxEventListener);
            window.removeEventListener('show-post-list', showPostListEventListener);
            window.removeEventListener('show-post', showPostEventListener);
        };
    });

    const handleMessageIsDone = useCallback(() => {
        const customEvent = new CustomEvent('end-dialog');
        window.dispatchEvent(customEvent);

        setMessage('');
        setShowDialogBox(false);
    }, [characterName]);

    useEffect(() => {
        async function initPhaser() {
            const Phaser = await import('phaser');
            const { default: GameScene } = await import('../game/scenes/GameScene');
            const { default: GridEngine } = await import('grid-engine');

            const game = new Phaser.Game({
                ...configs,
                parent: 'game-content',
                scene: [GameScene],
            });
        }

        initPhaser();
    }, []);

    return (
        <>
            {showDialogBox && (
                <DialogBox
                    message={message}
                    onDone={handleMessageIsDone}
                />
            )}
            {showBlogPost && (
                <BlogPost
                    post={post}
                />
            )}
            {showBlogPostList && (
                <BlogPostList
                    posts={allPosts}
                />
            )}
            <div id="game-content" />
        </>
    );
}

export default GamePage;

export const pageQuery = graphql`
    query GamePage() {
        allMarkdownRemark(
            sort: { fields: [frontmatter___date], order: DESC }
        ) {
            edges {
                node {
                    html
                    frontmatter {
                        date
                        title
                        category
                    }
                }
            }
        }
    }
`;
If you want to know more details about what happens inside the GameScene, check this blog post.
Conclusion
I had a lot of fun creating this game for my blog, and besides that, I learned a lot of new things in Phaser and React. Maybe I can even use part of this code to make a real top-down game :eyes:.

Special thanks
This game would not be possible without the help of some amazing people and their work, so here is my list of special thanks.
- photonstorm, for creating Phaser.io.
- Annoraaq, for creating the grid-engine plugin.
- ArMM1998, for the characters sprites and tilesets.
- PixElthen, for the slime sprites.
- pixelartm, for the pirate hat sprites.
- jkjkke, for the Game Over screen background.
- KnoblePersona, for the Main Menu screen background.
- Min, for the open book sprite.
Tags:
Related posts
Post a comment
Comments
Gyani singh on 1/15/25
thanksMatt on 8/9/22
I was smiling the whole time I was reading this. What a fun idea.Greg on 3/4/22
great post, thanks for the insight and the quality write up. I’ve been thinking of a similar concept for my portfolio/personal website where visitors could play a 2d game to explore my experiences rather than reading a wall of text. this inspired me to actually complete that project — thanks!Zayyad on 1/19/22
This is one of the most creative things I've seen. Really cool 👍